Flux
Redux
官方文档
Redux最主要是用作应用状态的管理,类似于Vue中的Vuex,是一个集中式的状态管理插件,但是Redux并不是React团队出品的,仅仅只是在React项目中使用的比较多,且与React的名字非常的相似而已; Redux可以在React,Vue以及Angular等前端框架中使用 !。简言之,Redux用一个单独的常量状态树(state对象)保存这一整个应用的 状态,这个对象不能直接被改变。当一些数据变化了,一个新的对象就会被创建(使用actions和reducers),这 样就可以进行数据追踪,实现时光旅行。
redux介绍及设计和使用的三大原则

- 单一数据源
整个应用程序的state被存储在一颗object tree中,并且这个object tree只存储在一个 store 中:
Redux并没有强制让我们不能创建多个Store,但是那样做并不利于数据的维护;
单一的数据源可以让整个应用程序的state变得方便维护、追踪、修改;
State是只读的
唯一修改State的方法一定是触发action,不要试图在其他地方通过任何的方式来修改State:
这样就确保了View或网络请求都不能直接修改state,它们只能通过action来描述自己想要如何修改state;
这样可以保证所有的修改都被集中化处理,并且按照严格的顺序来执行,所以不需要担心race condition(竟态)的问题;
- 使用纯函数来执行修改
通过reducer将旧state和actions联系在一起,并且返回一个新的State:
随着应用程序的复杂度增加,我们可以将reducer拆分成多个小的reducers,分别操作不同state tree的一部分;
但是所有的reducer都应该是纯函数,不能产生任何的副作用;
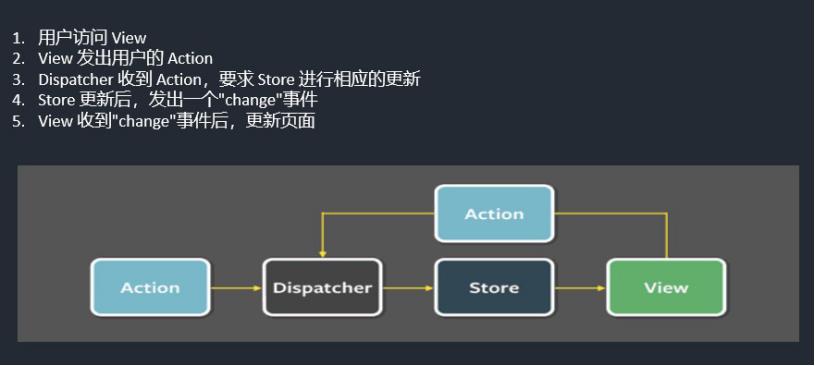
redux的工作流
上述动图可以看出,前端页面(UI)通过点击事件,触发Dispatch将一个带有最新的数据状态以Action对象包裹的形式发送给Store中的Reducer,Reducer接收到Action对象后再对Store中的State进行状态修改,随后State状态的修改引发页面的重新渲染(也就是页面中的数据重新变化!),这就是Redux的工作流程
Redux的基本使用
- 安装
Redux
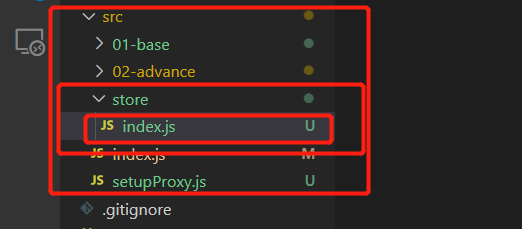
在项目的src目录下创建store文件夹并在该文件夹下创建index.js
设置index.js
import {createStore} from 'redux'
const initialState = {
isShow:true
}
const reducer = (preState,action)=>{
console.log('数据更新',action,preState);
let newState = {...preState}
switch (action.type) {
case 'showBottom':
newState.isShow = action.isShow
return newState
case 'closeBottom':
newState.isShow = action.isShow
return newState
default:
return initialState
}
}
const store = createStore(reducer)
export default store
|
- 在其他的组件中,我们可以使用
store.getState来获取全局store中的数据
import store from '../../store/index.js'
console.log(store.getState())
|
- 在组件中我们可以通过
dispatch发送action对象给reducer来修改全局store中的数据
store.dispatch({
type:'showBottom',
isShow:true,
})
const myAction = {type:'showBottom',isShow:true}
store.dispatch(myAction)
|
- 在全局的
reducer函数中设置处理逻辑,一般是推荐使用switch分支来指定对应的type字段执行对应的逻辑
const reducer = (preState,action)=>{
console.log('数据更新',action,preState);
let newState = {...preState}
switch (action.type) {
case 'showBottom':
newState.isShow = action.isShow
return newState
case 'closeBottom':
newState.isShow = action.isShow
return newState
default:
return preState
}
}
|
- 我们同样可以设置在派发
action之前,在任意组件中设置监听函数去监听全局store中的数据变化
componentDidMount(){
store.subscribe(()=>{
console.log('home组件监听中....');
this.setState({
isShow:store.getState().isShow
})
})
}
|
- 我们同样可以将
action封装成函数,使得action变成动态派发
const changeIsShowAction = (isShow) => ({
type: "change_isShow",
isShow
})
store.dispatch(changeIsShowAction(false))
|
案例展示:
要求: 首页组件包含并展示info组件以及about组件,点击对应的文字跳转对应的组件,进入info组件则展示底部区域,离开info组件则不展示底部区域
import {createStore} from 'redux'
const initialState = {
isShow:true
}
const reducer = (preState,action)=>{
console.log('数据更新',action,preState);
let newState = {...preState}
switch (action.type) {
case 'showBottom':
newState.isShow = action.isShow
return newState
case 'closeBottom':
newState.isShow = action.isShow
return newState
default:
return initialState
}
}
const store = createStore(reducer)
export default store
|
import React, { Component } from 'react'
import { HashRouter as Router, Route, Redirect, Switch, NavLink } from 'react-router-dom'
import store from '../../store/index.js'
import About from './about.js'
import Info from './info.js'
import Footer from './footer.js'
import NotFound from './404.js'
export default class home extends Component {
componentDidMount(){
store.subscribe(()=>{
console.log('home组件监听中....');
this.setState({
isShow:store.getState().isShow
})
})
}
state = {
isShow:store.getState().isShow
}
render() {
console.log('是否展示底部区域',this.state.isShow);
return (
<div>
<h1>首页</h1>
<p>(去到信息页关闭底部,去到关于页开启底部)</p>
<div style={{ width: '100%', height: '400px', backgroundColor: 'yellowgreen' }}>
<Router>
<ul>
<li><NavLink to={'/home/info'}>info</NavLink></li>
<li><NavLink to={'/home/about'}>about</NavLink></li>
</ul>
{/* 使用Switch来解决每次页面刷新,重定向功能执行的bug(模糊匹配) */}
<Switch>
<Route path="/home/about" component={About} />
<Route path="/home/info" component={Info} />
<Redirect from="/" to="/home/info" exact />
{/* 匹配不到的页面则展示404 */}
<Route component={NotFound} />
</Switch>
</Router>
</div>
{/* 通过判断全局store中的isShow来执行是否展示Footer组件 */}
{this.state.isShow && <Footer />}
</div>
)
}
}
|
import React ,{useEffect}from 'react'
import store from '../../store/index.js'
export default function Info() {
useEffect(()=>{
console.log('进入info组件');
store.dispatch({
type:'showBottom',
isShow:true
})
return ()=>{
console.log('退出info组件');
store.dispatch({
type:'closeBottom',
isShow:false
})
}
},[])
return (
<div>个人信息页</div>
)
}
|
结果展示:
拓展知识
Redux目录的结构划分
如果我们将所有的逻辑代码写到一起,那么当redux变得复杂时代码就难以维护。
例如上面代码中, 我们封装的动态创建action的函数, 这种动态生成action的函数在项目中可能会有很多个, 而且在其他多个文件中也可能会使用, 所以我们最好是有一个单独的文件夹存放这些动态获取action的函数
接下来,我会对代码进行拆分,将store、reducer、action、constants拆分成一个个文件。
- 创建
store/index.js文件: index文件中, 我们只需要创建store即可
const { createStore } = require("redux")
const reducer = require("./reducer")
const store = createStore(reducer)
module.exports = store
|
- 创建
store/reducer.js文件: 在真实项目中, reducer这个函数我们会越写越复杂, 造成我们index.js文件越来越大, 所以我们将reducer也抽离到一个单独的文件中
const { CHANGE_isShow } = require("./constants")
const initialState = {
isShow: true,
}
function reducer(preState = initialState, action) {
switch(action.type) {
case CHANGE_NAME:
return { ...preState, isShow: action.isShow }
default:
return initialState
}
}
module.exports = reducer
|
- 创建
store/constants.js文件: 将type的类型定义为常量(防止写错的情况), 这些常量最好也防止一个单独的文件中
const CHANGE_isShow = "change_isShow"
module.exports = {
CHANGE_isShow,
}
|
- 创建
store/actionCreators.js文件: 将封装的动态创建action的函数放在该文件中, 在需要使用的地方导入即可
const { CHANGE_isShow} = require("./store/constants")
const changeisShowAction = (isShow) => ({
type: CHANGE_isShow,
isShow
})
module.exports = {
changeisShowAction
}
|
- 最终形成如下目录结构, 这也是官方推荐的目录结构, 一个
store中包含这四个文件夹